ProxEfence Manual
- Why do you need the ProxeFence proxy server?
- Overview of ProxEfence Features
- Network Installation Guide
- Downloading, Installing and Running ProxEfence
- How to set up Web Browsers
- Settings for e-mail clients (Outlook, Mozilla, etc.)
- Setting up filtration
- Setting Groups
- Setting Users
- Filter Settings
- Main Settings
- How to find free port
- Setting up Internet Explorer
- Settings for Mozilla FireFox
- Settings for Opera
- POP3, IMAP4 protocols settings
- SMTP settings
- General Internet Settings
- HTTP settings
- HTTPS settings
- Mail settings
- SOCKS settings
- Changing the Administrator's Password
Why do you need the ProxeFence proxy server?
A proxy server works as an intermediate between client computers of local networks and an external net such as Internet. It processes clients requests to Internet resources, hides local network structure, provides client security and anonymity. ProxEfence filtering proxy server is intended to restrict access of the local network client to external net connections. The program should be installed on one server-computer, through which all passing Internet traffic will be filtered. Local network computers will then connect to Internet or extranet through the ProxeFence proxy server. All filtering settings are set on the Server Computer. The fact that no software is installed on the client PC allows:
- Convenience when installing, setting up, managing;
- Security and stability because any possibility for the client to change filtration settings is totally excluded.
ProxEfence Proxy Server supports protocols:
- HTTP 1.0 / 1.1 for access to WWW pages;
- HTTPS for access to secured WWW pages;
- FTP through HTTP for access to FTP servers by FTP clients;
- SOCKS 4 / 5 for the access of programs using SOCKS protocols;
- POP3, IMAP 4, SMTP for easy communication between mail client and mail servers in Internet.
ProxEfence as a filtering program allows you to:
- Establish separate settings for each client of a local network which will provide particular rules for using external networks, like Internet;
- HTTPS for access to secured WWW pages;
- FTP through HTTP for access to FTP servers by FTP clients;
- SOCKS 4 / 5 for the access of programs using SOCKS protocols;
- POP3, IMAP 4, SMTP for easy communication between mail client and mail servers in Internet.
Back to Top
Network Installation Guide
ProxEfence as a proxy server has to be installed on the server computer, i.e., on the computer that has a connection with other computers of a network and also is connected to Internet.
The server should have at least two interfaces (sometimes treat only by one interface): connection to the Internet and interface to connect with other computers of the network. Those other computers are referred to as clients. Usually clients connect to the server by a switch. To set up a proxy server you should know the IP address of the server interface through which clients are connected to the server.
Please refer to the Network Installation Guide (www.softforyou.com/prx-network_guide.html) to set up a network.
Downloading, Installing and Running ProxEfence
You can download ProxEfence from our website:
www.softforyou.com/prx-download.php
Install proxy server and customize settings.
By default, port 8008 have been installed for the proxy server.
For example, if port 8008 is already busy at other program and you have a port for the Server computer of 4400, you should replace server.sap = 0.0.0.0:8008 with server.sap = 0.0.0.0:4400 in the file " /Program Files/SoftForYou/ProxEfence/cfg/HTTP.cfg".
Do not change the 8008 port, if no program previously installed on the computer uses this port.
If you are using a Personal Firewall on Server, you should configure your firewall not to block ProxEfence modules.
For example, Windows XP with Service Pack 2 contains a built-in firewall, and if it is turned on then you should add ProxEfence modules: PefService.exe, ProxEfenceW.exe located in the " /Program Files/SoftForYou/ProxEfence" directory, into the Exceptions list of this firewall.
We recommend that you disable all your personal firewalls (including built-in Windows XP firewall) temporarily to make sure that the proxy server is working properly.
Note: Proxy server must be restarted if any change in the configuration file has been made (Click 'Restart Proxy' in ProxEfence menu).
Note: To find a free port, you need to check which ports are used. You should use the netstat -an command to see the ports that are being used on your computer. Please make sure that the port that you want to use is not listed in the netstat -an output.
For example, if you want to use port 8008, please make sure that there is no string like "*.*.*.*:8008" (where *.*.*.* is any IP address) in the netstat -an output.
To do this, please follow through these steps:
- Click Start, click Run, type cmd, and then click OK.
- At the command prompt, type the following, and then press ENTER:
netstat -an
- to write the netstat -an output to the port.txt file, type:
netstat -an > port.txt
Run proxy server.
After starting the program the icon-logo of ProxEfence will appear in the right bottom corner of the monitor - in the system tray.
You should right-click on this icon to open the menu that contains the following items:
- Testing Program - to open the ProxEfence Testing Program manual in a new window.
- Getting Started - to open the ProxEfence Getting Started manual in a new window.
- -----------
- Restart Proxy
- Setting up Filtration - to open http://setup.pef
- Registration
- About
- -----------
- Exit - stop the proxy server and unload the program from the computer
Back to Top
How to set up Web Browsers
Web Browsers of all computers in the network should have access to the Internet through the ProxEfence proxy server.
Setting up Internet Explorer
Push the Tools button, then select Internet Options, select Connections tab.
When connected to the Internet by dial-up or Virtual Private Network (VPN), push the Settings button, check the Use a proxy server for this connection checkbox. You should enter the IP address of the proxy server in the "Address" field.
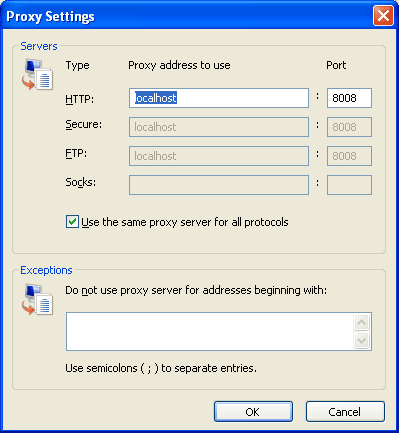
Use "localhost" as the IP address for your Server computer. If your Server is connected to a local network, you can use the IP address of your Server instead of "localhost".
Use your Server computer's IP address as the IP address for Client computers.
Use 8008 as a port number if you did not change the port before.
When connected to the Internet by cable or wireless, press the LAN settings button and enter the IP address and port as for Settings .
Example to configure web proxy settings in IE.
Proxy server address: 192.168.0.1
Push the Tools button, then select Internet Options, select Connections tab.
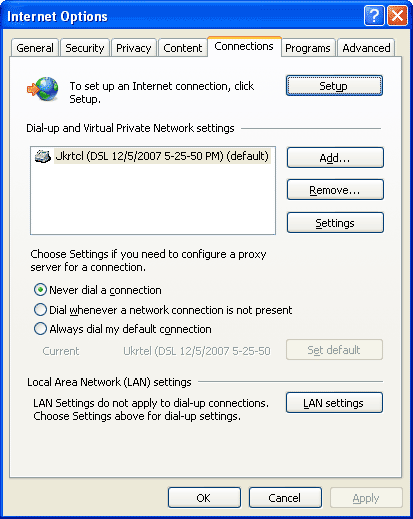
Click the "LAN Settings" button. Configure as it is shown below.
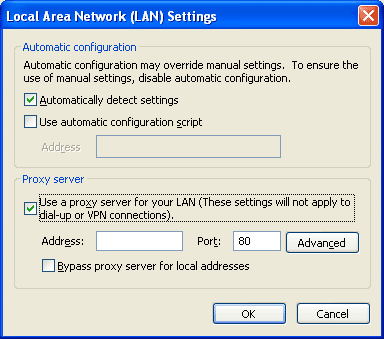
Click the "Advanced" button. Configure Clients as it is shown below.
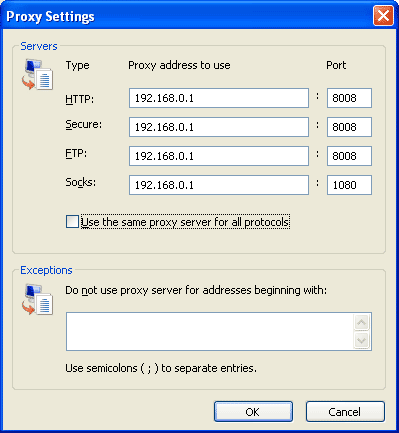
- or - Click the "Advanced" button. Configure Server as it is shown below.
Back to Top
Settings for Mozilla FireFox
Press the Tool button, then select Options..., select the Advanced tab, press the Settings button and select the Manual proxy configurations: button. You should enter the IP address of the proxy server into the fields.
Use "localhost" as the IP address for your Server computer.
Use your Server computer's IP address as the IP address for Client computers.
Enter 8008 into the field Port, if the number has not been changed before. Check the Use this proxy server for all protocols checkbox. Finally, press OK.
Back to Top
Settings for Opera
Press the Tools button, then select Preferences , select the Advanced checkbox, then select Network on the left side, press the Proxy server button. Turn on HTTP, HTTPS, FTP checkboxes. You should enter the IP address of the proxy server into the fields.
Use "localhost" as the IP address for your Server computer.
Use your Server computer's IP address as the IP address for Client computers.
Enter 8008 into the Port field, if the number has not been changed before. Check the Enable HTTP 1.1 for proxy checkbox, and finally press OK.
Back to Top
Settings for e-mail clients (Outlook, Mozilla, etc.)
POP3, IMAP4 protocols settings
Open the receive mail (POP3, IMAP4) settings. As a mail Server enter network IP address for the proxy server into the field.
Use "localhost" as the IP address for your Server computer.
Use your Server computer's IP address as the IP address for Client computers.
The way to create a User name (Login) is the following.
Example 1. Only one computer and no local network. Port is defined.
Original settings were like this:
Mail Server: mail.myserver.com:1234
User: myuser
New settings should be as follows:
Mail Server: localhost
User: myuser@mail.myserver.com:1234
Example 2. There is local network, no particular port is defined.
Original settings were like this:
Mail Server: mailserver.mail.com
Login: user@mail.com
New settings should be as follows:
Mail Server: 192.168.0.1
Login: user@mail.com@mailserver.mail.com
You can use @ and % symbols as a dividers. So, another version for the Login name in the second example is:
user@mail.com%mailserver.mail.com
Back to Top
SMTP settings
Open the Send Mail (SMTP) window. As an SMTP Server enter a network IP address for the proxy server into the field.
Use "localhost" as the IP address for your Server computer.
Use your Server computer's IP address as the IP address for Client computers.
Enter 8008 into the Port field, if the number has not been changed before. Then open file:
" \Program Files\SoftForYou\ProxEfence\cfg\smtp.cfg"
and change parameter 0.0.0.0:smtp to the real SMTP port of the proxy server:port in the expression
server.sap = 0.0.0.0:smtp
Then change parameter mailserver.com:smtp to the real SMTP server:port in the expression
relay.sap = mailserver.com:smtp
Port smtp is a designation of standard SMTP port (25).
For example, you have the address for SMTP server myserver.com. Then you have to make the changes:
server.sap = 0.0.0.0:smtp
relay.sap = myserver.com:smtp
Note: Proxy server must be restarted if any change in the configuration file has been made (Click 'Restart Proxy' in ProxEfence menu).
Back to Top
Setting up Filtration
To start filtration settings, you should enter http://setup.pef to any web browser.
You can always access the filtration settings using the program icon on the system tray. You only need to click it with the right mouse button and select 'Setting up Filtration' item.
ProxEfence can deliver different levels of restrictions for Internet access for every computer user. In this version of the program, users are defined by the IP address of the computer they use. Users who have the same level of restriction can be combined into groups to simplify the settings. Every group has its particular settings. If a user has individual settings, the administrator should add an additional group with only that user and set the setting for this group of one user.
Back to Top
Setting Groups
In the Group window you can add, delete or edit groups of users. Set filtration for each Group of users not for each user. Every Group includes users who have identical filtration settings. To create a new group, you should press the ADD button, enter the name of the group into the Name field and press OK. To edit the name of an existing group, select the group in the list and press the left button. To delete one or more existing groups, mark these groups in the corresponding check boxes and press the DELETE button.
Back to Top
Setting Users
In the Users window you can add, delete or edit users. The list of all proxy server groups will be in the left column of the window. You can select and work with users of one particular group or with all groups on the list. To create a new user, press the ADD button, enter the name of the user (IP address of user computer) into the IP field, select the group to which the user will be included from the list in the Group selector and press OK. This way the user will be entered into the database and the filtration rules of the selected group will be applied to this computer. To edit a user IP address or a group to which a user belongs, select the edited user in the list and press the left button. To delete one or more existing users, mark these users in the corresponding check boxes and press the DELETE button.
Back to Top
Filter Settings
This window is the main panel to set up filtration rules for the selected Group of Users. Select a group from the list on the left. Select a protocol (right upper corner) for which you will create the settings.
General Internet Settings. Common settings for all protocols.
These settings include:
- Blocked Categories. Determines what categories of web sites or other resources a selected group of users can access. There are 15 categories. To block access to resources related to one or more of these categories, mark the corresponding check boxes, and press the SAVE button.
- Timetable. Setting permitted times of Internet access with 30 minute increments for every day of the week. To turn this feature on or off, press the link Disabled / Enabled, on the General Internet Settings panel or turn on the Enable / Disable check box in the Timetable window.
You can allow or forbid Internet access for some days of the week or particular hours of the day by selecting corresponding squares on the table - green to allow and red squares to block access.
Each square represents 30 minutes of time. There are a few ways to select the time:
- press and release the left button
- press the left button and drag the mouse through the required squares
- select the whole column by pressing the number of the column on the top of the table or the whole line, selecting days of the week to the left of the table
- select the whole table pressing the Days/Hours square
- deselect all restrictions, marking Allow all
- block for all times, pressing Block all
To save settings that have been made in the Timetable window, press the SAVE button. - Time Limits. Time restriction for Internet access for every day of the week.
To turn this feature on or off, press on the link Disabled / Enabled, on the General Internet Settings or turn on the Enable / Disable check box on the Time Limits window. You can select the time from the selector list or enter the desired total time (in minutes) in the fields of the right column. Press the SAVE button to confirm your choice. - Traffic Limits. Limitations of Internet traffic for every day of the week.
To turn this feature on or off, press on the link Disabled / Enabled in General Internet Settings or turn on the Enable / Disable check box on the Traffic Limits window. You can select the traffic limitation in Megabytes for every day of the week. Press the SAVE button to confirm your choice.
HTTP settings. Settings for HTTP protocol.
The HTTP protocol is typically used in web browsers.
The following settings may be made to set up the protocol:
- Turn on or shut down a network completely, including Internet.
- Turn on or shut down filtration entirely.
- To allow or forbid Internet access by IP addresses.
- Managing Web Sites. The administrator can edit lists of allowable or blocked websites and can turn on or off embedded databases of Web Sites. He can also check to see if a web site belongs to any categories among all available lists.
The program has embedded databases of Trusted and Blocked sites. To turn the databases on or off, you should press on the link Disabled / Enabled in the General Internet Settings window.
There are also edited lists of bad and trusted web sites. To turn these lists on or off, you should press on the link Disabled / Enabled in the General Internet Settings window or turn on or off the check boxes located on the Web Sites window. These lists have a higher priority than embedded databases, so the web sites are first checked in the Site URL field, then the program checks if the sites are included into the edited lists and embedded databases. Web sites are also checked to see if they belong to any existing categories. These inquiries are accomplished by pressing the Test button. You also can add a site into edited lists of bad or trusted sites by pressing ADD TO BLOCKED or ADD TO TRUSTED buttons correspondingly. To edit a website, you should select the site by clicking the left button. To delete it from the list, check the site in the check box and press the DELETE button. - Blocked Words in URL. If a URL includes a word from the list, and that word belongs to at least one of the selected categories, then access to this URL will be blocked. The list of words can be edited. The program has a preset list of categorized words.
To turn these lists on or off, you should press on the link Disabled / Enabled in the General Internet Settings window or turn on or off the check box located in the Blocked Words in URL window. You can add a word (part of the word or template) into edited lists by pressing the ADD button, and then enter the word into the Word field, check the check boxes and press the OK button. To edit a word, you should select the word by clicking the left button. To delete a word from the list, check it in a check box and press the DELETE button. - Content Filtration. Dynamic filtration of content by key phrases and web page structures.
There are settings according to desired filtration strength. To turn on this feature, press the link Disabled / Enabled in General Internet Settings or turn on the Enable / Disable check box in the Content Filtration window. Select desired filtration strength from 5 possible levels using the selector. Press the SAVE button to confirm your choice.
HTTPS settings. Settings for HTTPS protocol.
The HTTPS protocol is typically used in web browsers.
The following settings may be made to set up the protocol:
- Turn on or shut down a network completely, including Internet.
- Turn on or shut down filtration entirely.
- To allow or forbid Internet access by IP addresses.
- Blocked Words in URL. If a URL includes a word from the list, and that word belongs to at least one of the selected categories, then access to this URL will be blocked. The list of words can be edited.
To turn the list of blocked words on or off, you should press on the link Disabled / Enabled in the General Internet Settings window or turn on or off the check boxes located in the Blocked Words in URL window. You can add a word (part of the word or template) into edited lists by pressing the ADD button, and then enter the word into the Word field, check the check boxes and press the OK button. To edit a word, you should select the word by clicking the left button. To delete a word from the list, check it in a check box and press the DELETE button.
Mail settings. Settings for e-mail protocols: POP3, IMAP4, SMTP.
These protocols are used for e-mail clients typically.
The following settings may be made to set up the protocol:
- Turn on or shut down a network completely, including Internet.
- Turn on or shut down filtration entirely.
- To allow or forbid Internet access by IP addresses.
SOCKS settings. Settings for protocols: SOCKS 4, SOCKS 5.
These protocols are used for IM, FTP clients typically.
The following settings may be made to set up the protocol:
- Turn on or shut down a network completely, including Internet.
- Turn on or shut down filtration entirely.
- To allow or forbid Internet access by IP addresses.
Main Settings
The settings are:
- To turn on or shut down filtration entirely for all groups.
- Field for administrators e-mail address that will be shown in the "Forbidden" window for feedback response.
- Changing the Administrator's Password.
To prevent unauthorized access to the control panel of the ProxEfence program and changing your settings by any other person, you should set up an administrator's password.
To change the administrator's password, push the "CHANGE PASSWORD" button and enter your new password.